Wednesday, December 10, 2008

12 Days of Christmas - Day 3 - Jelly anyone!

I started out this morning with a jar of jelly. Yes, a jar of jelly. In my Better Homes and Gardens magazine this month there was a pull out that had Smucker's jellies and recipes for each one. The moment I saw it I knew I wanted to do a gift idea with it.

This is what I came up with. I covered the jar with DSP paper. I cut the paper 3 3/4 x 11. Wrapped it around the jar. Then I wrapped a band around the jar. This was cut at 1 1/4 x 11. It will depend on which size jar you use. I then stamped Merry Christmas from the Punches Three hostess set and punched it out using the Square Scallop Punch. It is attached with stampin' dimensions. I wrapped natural twine around the top of the jar.

My idea with this project was to include the recipe. I would put this in a gift bag so I made a tag for my gift bag using the Winter Post stamp set. On the other side of the tag is the recipe for Strawberry Angel Cookies. The DSP paper is double sided but it matches the strawberry. What strawberry you ask?This is the top of the jar. I stamped the strawberry and cut it out. It is mounted on stampin' dimensions. I also punched a piece of the DSP and a piece of Naturals White using the Scallop Circle Punch and twisted them so that each scallop would show through.

Here is what was used to make this project:
Punches Three Stamp Set (Hostess Level I)
Tart and Tangy Stamp Set
Winter Post Stamp Set
Ski Slope Designer Series Paper
Naturals White Cardstock
Real Red Classic Ink pad
Chocolate Chip Classic Ink Pad
Real Red Marker
Old Olive Marker
Stampin' Dimensions
Natural Twine
Scallop Circle Punch
1/8 Punch
Square Scallop Punch
Recipe for Strawberry Angel Cookies:
Crisco Original No-stick cooking spray
1 (16oz) package Pillsbury Angel Food Cake
3/4 cup Smucker's Strawberry Jelly
3 Tbls. of mini semi-sweet chocolate chips
Heat oven to 325 F. Coat baking sheet with no-stick cooking spray.
Beat together cake mix and preserves at low speed until evenly moistened.
Continue to beat 1 minute. Stir is chocolate chips.
Drop by rounded tablespoons on prepared baking sheet.
Bake 10 to 12 minutes or until tops are just lightly browned. Cool 1 minute
on baking sheet. Place on cooling rack to cool completely.
Store between sheets of wax paper to keep from sticking together.

Tuesday, December 9, 2008

12 Days of Christmas - Day 2 - Ornament


My sister-in-law emailed me today needing an ornament idea. I was trying to come up with some ideas for her. This ornament is made out of a square chipboard coaster. I covered it with a 4x4 piece of Chocolate Chip cardstock using Mod podge. I then used a 3 3/4 x 3 3/4 piece of DSP . I stamped the poinsettia and "Christ is Born". Then cut it out. I also added some Rhinestones to the poinsettia. I took the SU! Circle Ice Rhinestones and opened them up and took the Rhinestone out. Very easy to do! Then glued them on with my two way glue pen. I also traced the saying with the two way glue pen and added Dazzling Diamonds. It doesn't show up to well in the picture unfortunately.
Here is what I used to make this Ornament:
Christ is Born Stamp Set
Circle Ice Rhinestones
Chocolate Chip Cardstock
Ski Slope Designer Series Paper
Whisper White Cardstock
Chocolate Chip Classic Ink
Ridinghood Red Classic Ink
Corner Rounder
Two Way Glue Pen
Dazzling Diamonds
Crop-A-Dile
Jumbo Eyelets
Kiwi Kiss Satin Ribbon
Mod Podge

Monday, December 8, 2008

12 Days of Christmas - Day 1 - Gift Card holder

I have been demonstrating these in my clubs and decided to share this as my first 12 days of Christmas project. Gift cards are great to give during the Christmas Season; however, you can give them for birthdays, anniversary, etc. You can decorate them for whatever the occasion may be.

This is the inside. You can also make these as your Christmas Card and add a family photo instead of a gift card. As you can see I have added a photo of my girls inside this one.
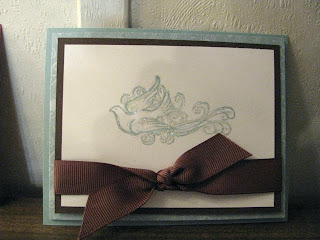


This is the second design that we made in club. I put Dazzling Diamonds on the Dove and on the Roof of the House using the Two Way glue pen. It doesn't show up well in the photo but it really adds alot to the project.

Here is how we made these:
Using the first design to go by....Cut a piece of cardstock at 4 3/4 x 3 3/4. This will be the "base" of your holder. Cut a piece of Designer Series paper at 3 1/2 x 11. Score this at 4 1/2 and 9 using the SU! cutter with scoring blade attached. Fold up and attach the smallest half with brads. This is the actual part that will hold your gift card or photo. Adhere this to the "base" of your card. Cut a piece of coordinating cardstock at 4 1/4 x 3 1/4. Also cut a piece of Whisper White cardstock at 4 x 3. Then decorate. On the one with the House on it you stamp the front of the Whipser White cardstock with the house from the To You and Yours stamp set in chocolate chip ink. Then stamp "From our house to yours" over the house again in chocolate chip ink. Adhere the Baja Breeze and Whisper White cardstock together. Tie a ribbon around it. Adhere it to the front of the Designer Series paper. Viola! Your done.

Here is the supplies you will need to make these:
To You and Yours Stamp set
Chocolate Chip Classic Ink Pad or Baja Breeze Classic Ink (depending if you are making the house or the Dove)
Ski Slope Designer Series Paper (this was used on both of the designs made in club)
Baja Breeze cardstock
Chocolate Chip cardstock
RidingHood Red cardstock
Neutral Brads
1/16 Punch
Dazzling Diamonds
Two Way glue pen
SU! Fiskars Cutter with scoring blade
Double Stitched Baja Breeze Ribbon
5/8 Grosgrain Chocolate Chip Ribbon

Friday, December 5, 2008

Christmas Cards


I decided to work on some Christmas cards today. I only have "18" different ones picked out that I like! :) I used the Cricut to cut out the square. You could always cut out a 4x4 square, use the corner rounder and then the 1/8 punch to punch out the corners. I put Chocolate Chip cardstock (scraps) over the holes on the back of the card to give it more dimension.
On this card I used:
Ruby Red Cardstock
Kraft Cardstock
Chocolate Chip Cardstock
Ski Slope Designer Series Paper
Winter Post Stamp Set
Lovely as A Tree (one of my favs)
Chocolate Chip Ink


Again, I used my Cricut to cut out the circles but you could always use the Coluzzle or The Big Shot. These are two different circles placed together with a punch from the Round Tab Punch. I cut the Chocolate Chip cardstock to 1 7/8 wide and the Whisper White to 1 3/4 wide. Adhere them together and placed them on the front of the circle. Then I just cut around the ends to round these two cardstocks. The circle is 4x4 so the strips were 4 1/4. I saw this on Splitcoaststampers as an ornament and decided to make it a card. I am pleased with the way it turned out.

On this card I used
:
Bashful Blue Cardstock
Chocolate Chip Cardstock
Whisper White Cardstock
Chocolate Chip Ink
Round Tab Punch
Neutrals eyelets
Crop-A-dile
Silver Cord
I will be starting my 12 days of Christmas next week so stay tuned for that. I have decided to start it on Monday the 8th as it is easier for me to start a new project at the beginning of the week instead of in the middle! :) I will post more on that starting next week. Have a great weekend and remember if you need anything you can always go to my website http://www.crazyboutstampin.stampinup.net/ and place an order. Any orders placed by Dec. 15th are guaranteed for Christmas delivery.

Thanks for looking!

Monday, December 1, 2008

Baby Shower!!


I am sorry I have been away so long. I really have been working on some projects. We had a "surprise" baby shower for my sister-in-law this past Saturday so I was not able to post anything until the shower was over. The theme for her shower was "Pickles and Ice Cream". Here are the items I did for her shower.


I made two of the lollipop "pickle" vases. I put the lollipops on skewers and wrapped them in floral tape. I used the scallop punch, 1 3/8 circle punch, 1/8 circle punch, crimper, Whisper White, Kiwi Kiss and Basic Black cardstock. I also used some retired Regal Rose ribbon to tie around the sticks of the lollipops. The ribbon on the bottom is the Regal Rose Double stitched ribbon that is still available. I filled the ice cream parlor cup (from the Dollar Store) with stredded brown paper to look like chocolate ice cream.


These were so fun to make. I made nine of these to give away. I used Dollar Store ice cream scoops. I filled a small cello bag with Hershey Kisses and put mini glue dots on the bottom to hold it in the scoop. Again, I used the punches and cardstock to make the "Pickles". The brown dot ribbon I picked up at Wal-Mart. The saying on the scallop punch says "A Scoop of Love and a few kisses, Thanks for all your love and wishes". I punched out four other scallops in Chocolate Chip cardstock and placed them around the Whisper White saying to look like a larger scallop punch. It is hard to see in the photo.

Here is a two page layout I did for her to keep her memories on. On the sides I left the spaces for the ladies to sign their name or write a little message to my sister-in-law. I used a retired stamp set from Stampin' Up! Perfect Party is the name of it. The lady shadow and Baby Shower was done on my Cricut Machine. I think I failed to mention that her color theme was Chocolate Chip, Certianly Celery and Regal Rose. I am sure you have figured that out by now! :)


This is the banner I made. It is mostly made with retired SU! Designer Series Paper. I wish I could say I cut the circles out with the Big Shot, but it is still on my wishlist. I used my Cricut to cut them out. I would have liked to have gotten closer but it was impossible because of the length of the banner.


I will be doing the 12 days of Christmas starting on Dec. 11th until the 23rd. I will be displaying some gift giving ideas for the holidays so stay tuned!


Thanks!